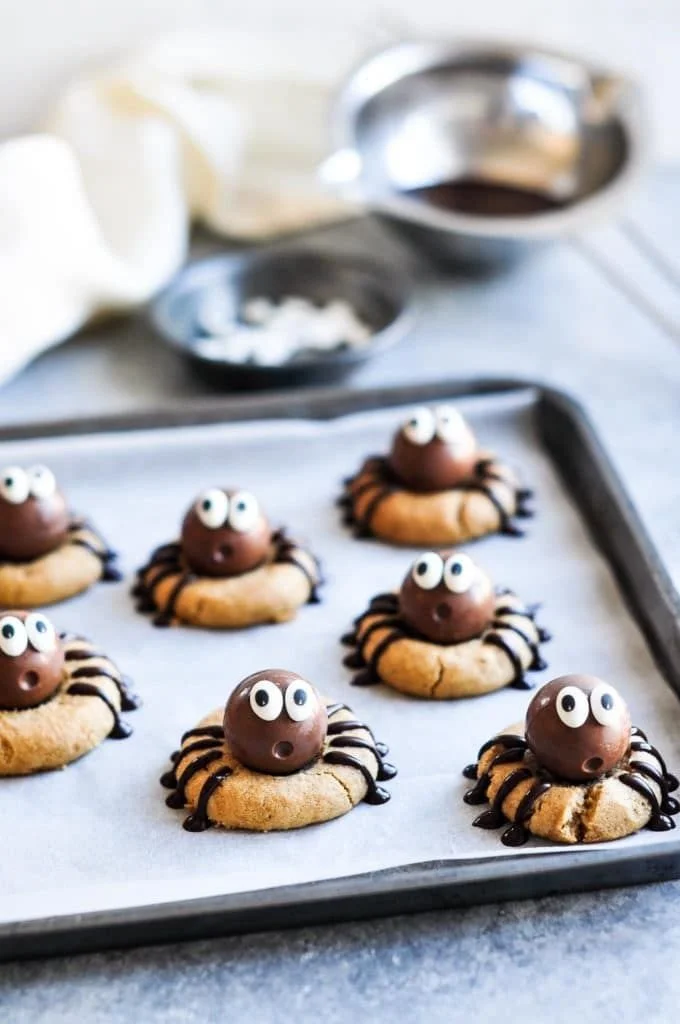
Halloween is around the corner, and what better way to celebrate than with a fun and tasty treat like Spider Cookies? These delightful peanut butter cookies are not only easy to make but also give a playful nod to the Halloween spirit with their creative spider decoration. Whether you’re baking with kids or looking to impress at a Halloween party, this recipe will surely bring a smile to everyone’s face.
Why You’ll Love Spider Cookies
- Easy to Make: This recipe uses simple ingredients and straightforward steps, making it perfect for novice bakers.
- Fun for All Ages: Kids can join in on the decorating, turning baking into a fun Halloween activity.
- Peanut Butter Goodness: Each cookie features the rich and creamy flavor of peanut butter that contrasts beautifully with chocolate chips.
- Customizable Decorations: Let your creativity shine by using different candies for the spider decorations.
- Perfect for Sharing: These cookies are great for parties, school events, or simply for treating your family and friends during the spooky season.
Recipe Overview
- Prep Time: 15 minutes
- Cook Time: 12 minutes
- Total Time: 27 minutes
- Servings: About 24 cookies
- Difficulty Level: Easy
Ingredients You’ll Need for Spider Cookies
-
For the Cookie Dough:
- 1 cup butter, softened
- 1 cup sugar
- 1 cup brown sugar, packed
- 2 large eggs
- 1 teaspoon vanilla extract
- 3 cups all-purpose flour
- 1 teaspoon baking soda
- 1/2 teaspoon salt
-
For the Mix-ins:
- 1 cup rolled oats
- 1 cup chocolate chips
- 1 cup smooth peanut butter
-
For Decoration:
- Candy eyes
- M&Ms or chocolate candies (for the spider body)
How to Make Spider Cookies
-
Preheat the Oven: Preheat your oven to 350°F (175°C) to ensure even baking.
-
Cream the Butters and Sugars: In a large bowl, cream together the softened butter, sugar, and brown sugar until the mixture becomes light and fluffy. This usually takes about 2-3 minutes.
-
Add Eggs and Vanilla: Beat in the eggs one at a time, mixing well after each addition. Then, stir in the vanilla extract for added flavor.
-
Combine Dry Ingredients: In another bowl, mix the all-purpose flour, baking soda, and salt. Gradually add this dry mixture to the creamed mixture until fully combined.
-
Incorporate Oats and Chocolate Chips: Stir in the rolled oats and chocolate chips, mixing until well combined. The dough should be slightly thick.
-
Shape the Cookies: Drop tablespoonfuls of the dough onto ungreased baking sheets, spacing them 2 inches apart to allow for spreading during baking.
-
Bake: Bake in the preheated oven for 10-12 minutes or until the cookies turn a light golden color. Keep an eye on them towards the end of baking.
-
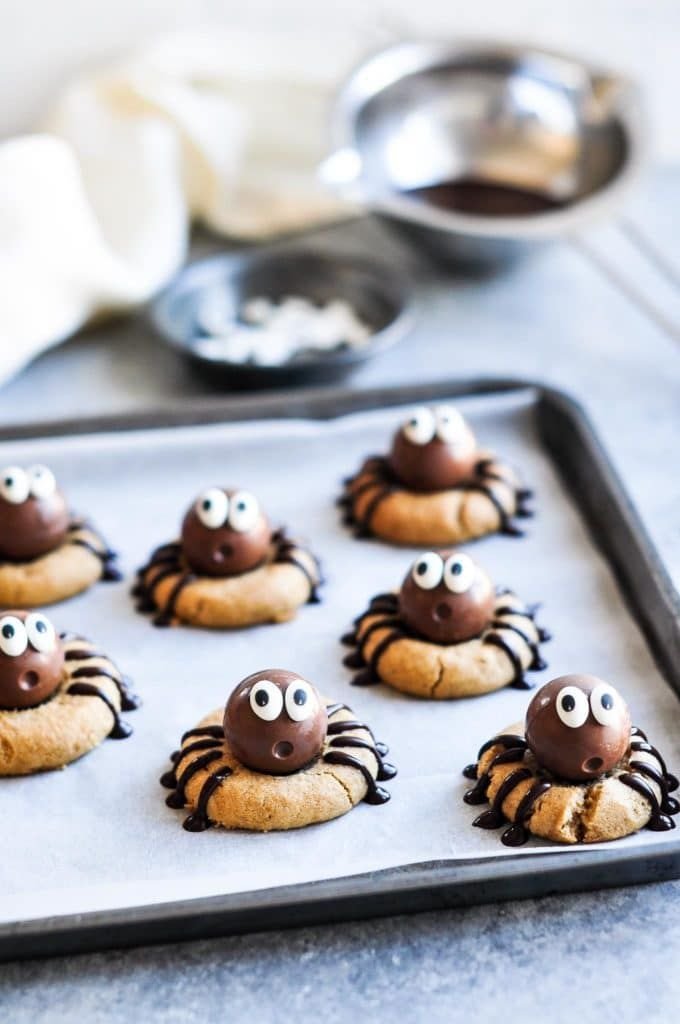
Create Spider Shapes: While the cookies are still warm, use the smooth peanut butter to form the spider bodies and legs on each cookie. The body can be formed with a dollop of peanut butter, while the legs can be drawn out with the back of a spoon.
-
Add Candy Eyes: Place candy eyes on top of each spider shape to give them a fun and spooky look.
-
Cool and Enjoy: Allow cookies to cool on the baking sheet for a few minutes before transferring them to a wire rack. Enjoy your Spider Cookies!
Tips for Success
- Softened Butter: Make sure your butter is softened to room temperature for easier blending. You can leave it out for about an hour or soften it in the microwave for 5-10 seconds.
- Chill the Dough: If you find that your dough is too soft, chill it in the fridge for about 30 minutes before shaping to help the cookies hold their shape.
- Don’t Overbake: Remove the cookies from the oven when they are lightly golden at the edges. They will continue to firm up as they cool.
- Use Fresh Ingredients: Ensure that your baking soda is fresh for the best rise and texture in your cookies.
- Experiment with Add-ins: Feel free to substitute chocolate chips with any nut varieties, dried fruits, or your favorite candy for personalization.
Easy Variations
- Nut-Free Option: Use seed butter (like sunflower seed butter) instead of peanut butter for a nut-free version.
- Add Spices: Give your cookies a warm flavor by adding a teaspoon of cinnamon or a pinch of nutmeg.
- Chocolate Version: For chocolate lovers, incorporate cocoa powder (about 1/3 cup) into the flour mixture to make double chocolate cookies.
- Use Whole Wheat Flour: For a slightly healthier cookie, swap half of the all-purpose flour for whole wheat flour.
- Gluten-Free Version: Substitute the all-purpose flour with a gluten-free flour blend to make these cookies gluten-free.
What to Serve with Spider Cookies
- Milk: A classic pairing; the rich flavor of the cookies pairs perfectly with a glass of cold milk.
- Hot Cocoa: Serve with a warm cup of hot cocoa for a cozy treat.
- Halloween Punch: A spooky punch or flavored soda pop complements the Halloween theme and adds a festive touch.
- Ice Cream: A scoop of vanilla or chocolate ice cream is a delicious way to balance the flavors of the cookies.
- Fresh Fruit: Apples or strawberries add a refreshing contrast to the rich, sweet cookies.
Storage and Reheating
- Refrigerator Storage: Store leftover cookies in an airtight container in the refrigerator for up to a week.
- Freezer Storage: Freeze cookies in a single layer, then transfer to a freezer-safe bag. They can be kept for up to three months.
- Reheating Method: To enjoy warm cookies, reheat in the microwave for 10-15 seconds; this will help restore softness.
- Preserve Texture: Store cookies with a slice of bread in the container to maintain their softness.
- Meal Prep Note: Dough can be made ahead and refrigerated for 1-2 days, or frozen for longer storage.
Common Mistakes to Avoid
- Using Cold Butter: Cold butter can lead to dense cookies, so always use softened butter.
- Incorrect Baking Temperature: Make sure your oven is properly calibrated; cookies baked at incorrect temperatures can end up too soft or burnt.
- Not Measuring Ingredients: Use measuring cups and spoons for accuracy in your ingredients, especially flour.
- Overmixing the Dough: Mixing too much can make the cookies tough. Mix just until the dry ingredients are combined.
- Skipping the Cooling: Allow cookies to cool on the baking sheet briefly before moving to a rack to prevent them from breaking apart.
Spider Cookies: Background & Cultural Inspiration
Spider Cookies are a fun and imaginative treat that blend traditional cookie recipes with playful Halloween themes. Halloween itself is celebrated with an emphasis on creativity and fun, and baking themed treats has become a part of that tradition. The idea of creating spooky snacks makes the holiday interactive and enjoyable for families, especially when kids can engage in the decorating process. Peanut butter cookies, a beloved classic, take on a new life with the added creative twist of spider shapes, merging comfort food with festive fun.
Frequently Asked Questions
Can I make the dough ahead of time?
Yes, you can prepare the dough in advance and refrigerate it for up to two days or freeze it for longer storage.
Can I use crunchy peanut butter instead of smooth?
Yes, using crunchy peanut butter will add a nice texture to the cookies.
How can I store decorated cookies?
Store decorated cookies in an airtight container, but be careful not to stack them if the decorations could get squished.
What candies can I use for spider decorations?
You can use any small candies like gummy worms, chocolate-covered raisins, or even pretzels for the spider legs.
Can I replace oats with something else?
If you’d like, you can replace rolled oats with additional flour, though this will change the texture slightly.
Final Thoughts
Spider Cookies are an enjoyable and whimsical way to celebrate Halloween while satisfying your sweet tooth. They are easy to make, fun to decorate, and perfect for sharing with family and friends. No matter the occasion, these peanut butter delights are bound to become a favorite treat. Gather your ingredients, grab the kids or your baking buddies, and dive into this fantastic Halloween baking adventure. Enjoy your sweet creations!
PrintSpider Cookies

Fun and tasty peanut butter cookies decorated to look like spooky spiders, perfect for Halloween celebrations.
- Prep Time: 15 minutes
- Cook Time: 12 minutes
- Total Time: 27 minutes
- Yield: 24 cookies
- Category: Dessert
- Method: Baking
- Cuisine: American
- Diet: Vegetarian
Ingredients
- 1 cup butter, softened
- 1 cup sugar
- 1 cup brown sugar, packed
- 2 large eggs
- 1 teaspoon vanilla extract
- 3 cups all-purpose flour
- 1 teaspoon baking soda
- 1/2 teaspoon salt
- 1 cup rolled oats
- 1 cup chocolate chips
- 1 cup smooth peanut butter
- Candy eyes
- M&Ms or chocolate candies (for the spider body)
Instructions
- Preheat your oven to 350°F (175°C) to ensure even baking.
- Cream together the softened butter, sugar, and brown sugar until light and fluffy.
- Beat in the eggs one at a time, mixing well after each addition. Stir in vanilla extract.
- Mix the flour, baking soda, and salt in another bowl. Gradually add this to the creamed mixture until fully combined.
- Stir in the rolled oats and chocolate chips, mixing until well combined.
- Drop tablespoonfuls of dough onto ungreased baking sheets, spacing them 2 inches apart.
- Bake for 10-12 minutes or until lightly golden.
- Create spider shapes with peanut butter while cookies are still warm.
- Place candy eyes on top of each spider shape.
- Cool on sheets before transferring to a wire rack.
Notes
Use softened butter for easier blending. Chill the dough if too soft, and don’t overbake the cookies.