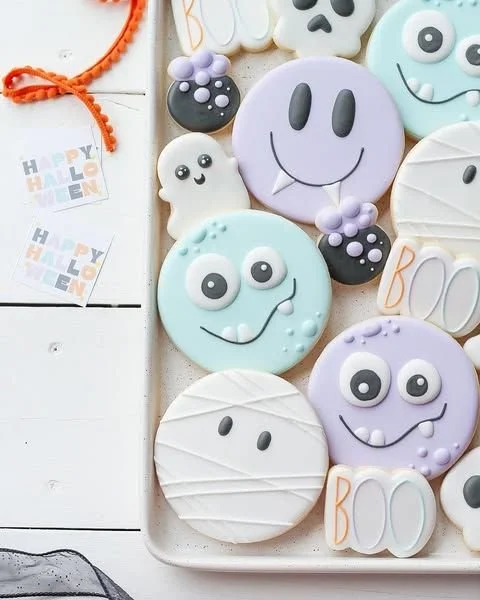
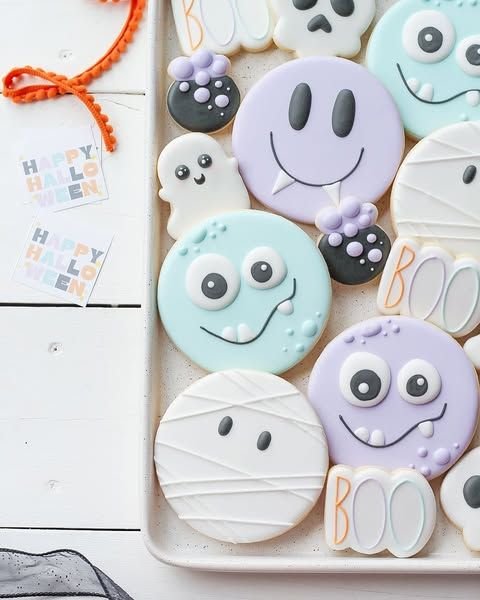
This Halloween Baby Cookies recipe is a delightful way to celebrate your little one’s first Halloween. These adorable and festive sugar cookies decorated with royal icing are not only fun to create but also bring a smile to everyone’s face, making them perfect for parties or as a sweet treat to enjoy at home.
Why You’ll Love Halloween Baby Cookies
- Adorable Designs: These cookies are designed to be cute and festive, making them perfect for a celebration.
- Flexible Decorating: The royal icing can be colored and shaped in numerous ways, allowing for personalization and creativity.
- Easy to Make: With simple steps, even novice bakers can create beautiful treats.
- Delightful Flavor: Sugar cookies have a timeless taste that’s both sweet and satisfying, perfect for all ages.
- Perfect for Sharing: Whether you’re hosting a gathering or need a sweet surprise for friends, these cookies are great for bringing people together.
- Memorable Keepsake: Celebrate your baby’s first Halloween with a special treat that can be cherished in photographs and memories.
Recipe Overview
- Prep Time: 30 minutes
- Cook Time: 10-12 minutes
- Total Time: 2 hours (includes cooling and decorating)
- Servings: Approximately 24 cookies
- Difficulty Level: Easy
Ingredients You’ll Need for Halloween Baby Cookies
-
For the Cookies:
- 3 cups all-purpose flour (for structure)
- 1 teaspoon baking powder (for leavening)
- ½ teaspoon salt (to enhance flavor)
- 1 cup unsalted butter, softened (creates a rich texture)
- 1 ½ cups granulated sugar (for sweetness)
- 2 large eggs (for binding)
- 2 teaspoons vanilla extract (for flavor)
-
For the Royal Icing:
- 4 cups powdered sugar (for sweetness and texture)
- 3 tablespoons meringue powder (for stability)
- ½ cup water (to achieve the right consistency)
- Food coloring (to decorate your cookies)
How to Make Halloween Baby Cookies
-
Prepare the Dough
In a large bowl, combine flour, baking powder, and salt. In another bowl, beat the softened butter and sugar until light and fluffy. Add in eggs and vanilla, mixing until well combined. Gradually fold in the dry ingredients until a dough forms. -
Chill the Dough
Divide the dough into two disks, wrap in plastic wrap, and refrigerate for at least 1 hour. This step is essential for easy rolling and cutting. -
Roll Out the Dough
Preheat your oven to 350°F (175°C). On a lightly floured surface, roll out one disk of dough to about ¼ inch thick. Use cookie cutters to shape the cookies into your desired Halloween designs, like pumpkins, ghosts, or bats. -
Bake the Cookies
Place cut-out cookies on a baking sheet lined with parchment paper, spacing them an inch apart. Bake for 10-12 minutes, or until lightly golden around the edges. Allow cookies to cool on the baking sheet for a few minutes before transferring them to wire racks to cool completely. -
Make the Royal Icing
In a medium bowl, combine powdered sugar, meringue powder, and water. Mix on medium speed until stiff peaks form. Add food coloring to achieve your desired shades. -
Decorate Your Cookies
Once the cookies are cool, outline and fill them with royal icing using piping bags. Let the icing dry for several hours or overnight for the best results.
Tips for Success
- Ensure Butter is Softened: Softened butter incorporates air, giving cookies a light texture.
- Chill the Dough Well: Never skip the chilling step; it helps maintain the shape of the cookies while baking.
- Use a Timer: To prevent overbaking, set a timer for the lower end of the baking time and check from there.
- Decorate with Simple Designs: If you’re a beginner, start with basic shapes and colors before moving on to more intricate designs.
- Test Cookie Thickness: Aim for a consistent thickness while rolling out the dough to ensure even baking.
Easy Variations
- Add Spice: Mix in some cinnamon or pumpkin spice to the dough for a fall-inspired flavor.
- Gluten-Free Option: Substitute all-purpose flour with a gluten-free blend for a suitable alternative.
- Chocolate Chip Cookies: Add mini chocolate chips into the dough for chocolatey goodness.
- Different Shapes: Use different cookie cutters to celebrate other fall holidays or themes, such as Thanksgiving.
- Sprinkle Topping: Before baking, add colorful sprinkles for added fun and flair.
What to Serve with Halloween Baby Cookies
- Milk: A classic pairing that complements the sweetness of the cookies.
- Hot Chocolate: A subtly rich drink that enhances the festive spirit of Halloween.
- Vanilla Ice Cream: The creaminess balances the sweetness of the cookies, adding a delightful contrast.
- Pumpkin Spice Latte: This seasonal favorite links well with the fall vibe of Halloween.
- Fruit Plates: A fresh fruit platter offers a refreshing counterpoint to the indulgent sweetness of the cookies.
Storage and Reheating
- Refrigerator Storage: Store the decorated cookies in an airtight container at room temperature for up to one week.
- Freezer Storage: Freeze unbaked cookie dough for up to three months; when ready, simply thaw and bake.
- Best Reheating Method: If needed, microwave for about 10 seconds to warm slightly but be cautious not to overheat and dry them out.
- Preserving Texture: Keep separator sheets between layers of cookies to prevent sticking.
Common Mistakes to Avoid
- Overmixing the Dough: This can lead to tough cookies; mix until just combined.
- Not Letting the Icing Dry: Rushing the decorating process can result in smudged designs.
- Skipping the Chilling Time: This is crucial for cutting shapes that hold during baking.
- Not Using Parchment Paper: Baking directly on a pan can result in uneven baking and sticking.
- Ignoring Oven Temperature: Always preheat your oven fully for consistent baking results.
Halloween Baby Cookies: Background & Cultural Inspiration
Halloween has a rich history rooted in ancient traditions, blending Celtic rituals with modern celebrations. The practice of baking cookies and treats for Halloween has evolved as a way to gather and celebrate with loved ones. Baby cookies, decorated for the first Halloween, symbolize the joy of family traditions and the creativity of baking. They also allow parents to instill the spirit of sharing and celebration in their little ones from an early age. Adding festive decorations makes these cookies a canvas for artistic expression while acknowledging the playful spirit of Halloween.
Frequently Asked Questions
Can I use different types of flour for the cookies?
You can use gluten-free flour or almond flour for variations, but be prepared for potential texture changes.
How do I prevent my cookies from spreading?
Ensure your dough is properly chilled. Also, avoid overmixing, which can lead to excessive spreading.
Can I make these cookies ahead of time?
Yes! Both the dough and the baked cookies can be made ahead. Store the dough in the refrigerator for up to a week or freeze for longer storage.
What if my royal icing is too runny?
Add more powdered sugar to thicken the icing; the consistency should be similar to toothpaste for piping outlines.
How long will these cookies last?
Stored in an airtight container, they can last for about a week. For best texture, consume them within a few days.
Final Thoughts
These Halloween Baby Cookies are a charming addition to your holiday festivities, capturing the joy and creativity of baking with little ones. With simple ingredients and easy steps, they’re a wonderful way to engage in a fun activity that the whole family can enjoy. Celebrate your baby’s first Halloween with these delightful cookies that are sure to create lasting memories. Happy baking!
PrintHalloween Baby Cookies

Celebrate your little one’s first Halloween with these adorable and festive sugar cookies decorated with royal icing, perfect for parties or as a sweet treat at home.
- Prep Time: 30 minutes
- Cook Time: 12 minutes
- Total Time: 120 minutes
- Yield: 24 cookies
- Category: Dessert
- Method: Baking
- Cuisine: American
- Diet: Vegetarian
Ingredients
- 3 cups all-purpose flour
- 1 teaspoon baking powder
- ½ teaspoon salt
- 1 cup unsalted butter, softened
- 1 ½ cups granulated sugar
- 2 large eggs
- 2 teaspoons vanilla extract
- 4 cups powdered sugar (for royal icing)
- 3 tablespoons meringue powder (for royal icing)
- ½ cup water (for royal icing)
- Food coloring (for decorating)
Instructions
- Prepare the Dough: In a large bowl, combine flour, baking powder, and salt. In another bowl, beat the softened butter and sugar until light and fluffy. Add in eggs and vanilla, mixing until well combined. Gradually fold in the dry ingredients until a dough forms.
- Chill the Dough: Divide the dough into two disks, wrap in plastic wrap, and refrigerate for at least 60 minutes.
- Roll Out the Dough: Preheat your oven to 350°F (175°C). On a lightly floured surface, roll out one disk of dough to about ¼ inch thick. Use cookie cutters to shape the cookies into your desired Halloween designs.
- Bake the Cookies: Place cut-out cookies on a baking sheet lined with parchment paper, spacing them an inch apart. Bake for 10-12 minutes, or until lightly golden around the edges. Allow cookies to cool before transferring them to wire racks to cool completely.
- Make the Royal Icing: In a medium bowl, combine powdered sugar, meringue powder, and water. Mix on medium speed until stiff peaks form. Add food coloring to achieve your desired shades.
- Decorate Your Cookies: Once the cookies are cool, outline and fill them with royal icing using piping bags. Let the icing dry for several hours or overnight.
Notes
Ensure butter is softened and allow the icing to dry properly for the best results. Use parchment paper to prevent cookies from sticking.