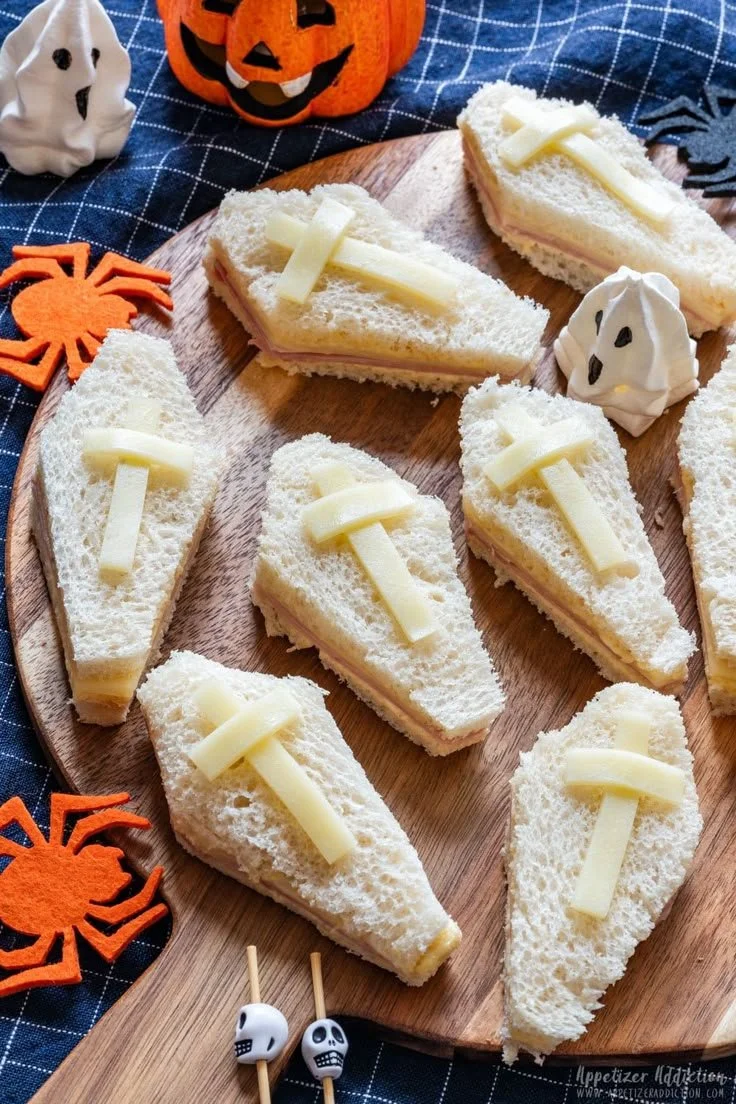
Halloween Coffin Sandwiches offer a fun, spooky twist to the classic sandwich. They’re perfect for Halloween parties, school events, or just a creative lunch at home. With their playful shape and easy preparation, these sandwiches are sure to impress kids and adults alike. Plus, they pack delicious flavors with a simple mix of ham, cheese, and mustard-mayo spread, making them a delightful treat worth making.
Why You’ll Love Halloween Coffin Sandwiches
- Creative Presentation: Shaped like spooky coffins, these sandwiches are a fun way to celebrate the Halloween spirit without being overly festive or intimidating.
- Easy to Make: With just a few simple ingredients and steps, even a beginner cook can whip these up in no time.
- Customizable Flavors: You can adjust the fillings to suit your taste preferences or dietary needs, making these sandwiches versatile for any gathering.
- Perfect for Parties: These coffin-shaped sandwiches can be a hit at any Halloween event, adding a playful touch to your spread.
- Fun for Kids: Children will enjoy not only the fun shapes but also the flavorful fillings, making lunch an exciting experience.
Recipe Overview
- Prep Time: 15 minutes
- Cook Time: 0 minutes
- Total Time: 15 minutes
- Servings: 6 servings
- Difficulty Level: Easy
Ingredients You’ll Need for Halloween Coffin Sandwiches
-
Spread:
- ⅓ cup mayonnaise (adds creaminess)
- 1 tablespoon Dijon mustard (for tanginess)
-
Bread & Fillings:
- 12 thin slices sandwich bread (white or whole grain works well)
- 12 slices ham (thin slices or 6 thick, depending on preference)
- 7 slices cheese (choose a cheese that melts well if desired)
here
How to Make Halloween Coffin Sandwiches
-
Mix the Spread: In a small bowl, combine the mayonnaise and Dijon mustard. Stir until thoroughly mixed.
-
Prepare the Bread: Spread a thin layer of the mayo-mustard mixture over each slice of bread, ensuring even coverage for flavor.
-
Assemble the Sandwiches: Top 6 of the bread slices with a layer of ham and a layer of cheese. Cover each with one of the remaining slices of bread to form sandwiches.
-
Trim the Crusts: Using a sharp knife, carefully trim off the crusts from each sandwich to create a uniform shape.
-
Cut into Coffins: Cut each sandwich in half to form rectangles. Then, trim the corners to create a coffin shape.
-
Add Details: From the last slice of cheese, cut thin strips and arrange them on top of each sandwich in a cross shape, like a gravestone decoration.
-
Chill: Cover the sandwiches with plastic wrap and place them in the refrigerator until ready to serve.
Tips for Success
- Choose Fresh Bread: Fresh bread not only tastes better but also holds together well when filled.
- Use Sharp Knife: A sharp knife will make it easier to cut the sandwiches without squishing them.
- Experiment with Spreads: Mix in a little garlic powder or herbs into the mayo for an extra flavor boost.
- Keep Ingredients Ready: Prep all ingredients before assembling to streamline the process and avoid any mess.
Easy Variations
- Meat Alternatives: Substitute ham with turkey, roast beef, or even avocado for a vegetarian version.
- Cheese Choices: Use cheddar, mozzarella, or even pepper jack for a kick.
- Add Veggies: Include lettuce, spinach, or thinly sliced cucumbers for a fresh crunch.
- Gluten-Free Option: Use gluten-free bread to cater to those with dietary restrictions.
- Spread Ideas: Swap the mayo-Dijon mix for a flavored cream cheese spread for added richness.
What to Serve with Halloween Coffin Sandwiches – Appetizer Addiction
- Veggie Tray: Colorful, crunchy veggies like carrots, cucumbers, and bell peppers pair well with the sandwiches for a refreshing contrast.
- Fruit Skewers: Fruit adds natural sweetness and balances the savory sandwiches; try using seasonal fruits like apples or grapes.
- Chips: A side of crunchy chips provides texture and can be a fun way to complement the sandwiches.
- Themed Treats: Consider serving spooky cookies or Halloween-themed snacks for a cohesive festive theme.
Storage and Reheating
- Refrigerator Storage: Keep leftover sandwiches in an airtight container in the refrigerator for up to 2 days.
- Freezer Storage: If you want to plan ahead, these sandwiches can be assembled and then wrapped tightly and frozen for up to a month. Thaw in the refrigerator overnight before serving.
- Best Reheating Method: For a warm version, reheat in an oven or toaster oven at 350°F until warm and the cheese is melted, usually about 10 minutes.
Common Mistakes to Avoid
- Using Stale Bread: Always use fresh bread to prevent sogginess and ensure a pleasant texture.
- Overstuffing: Adding too much filling can make the sandwiches difficult to cut and eat, so aim for a balanced amount.
- Skipping Chill Time: Allowing the sandwiches to chill helps the flavors meld and makes them easier to cut without falling apart.
- Not Trimming Carefully: If the crusts are not trimmed neatly, the sandwiches may look uneven which can impact presentation.
Halloween Coffin Sandwiches: Background & Cultural Inspiration
Halloween Coffin Sandwiches draw inspiration from the playful and spooky traditions surrounding Halloween. The holiday has origins in ancient Celtic festivals, particularly Samhain, which celebrated the end of the harvest season and the beginning of winter. Today, Halloween is characterized by festive costumes, decorations, and themed foods that encourage creativity and togetherness. These sandwiches capture that spirit and offer a fun way to engage families and friends in seasonal celebrations.
Frequently Asked Questions
Can I make these sandwiches ahead of time?
Yes, you can prepare them the night before and store them in the refrigerator, which can enhance the flavors.
What are some good substitutes for mayonnaise?
Greek yogurt or avocado mash can be excellent replacements for mayonnaise if you’re looking for a lighter option.
How can I spice up the flavor?
Adding various herbs, spices, or even a dash of hot sauce to the mayo can elevate the flavor profile.
Are these sandwiches suitable for freezing?
Yes, they freeze well before assembly. You can assemble them later for fresh sandwiches.
How do I avoid soggy sandwiches?
Ensure you use fresh ingredients and don’t overapply condiments. Chilling the sandwiches also helps them maintain their shape and texture.
Final Thoughts
Halloween Coffin Sandwiches are a delightful, easy-to-make treat that adds a special touch to any Halloween celebration. Their creative presentation, combined with customizable flavors, makes them an enjoyable option for gatherings or simply a fun lunch at home. So gather your ingredients, get creative, and enjoy a tasty treat that’s sure to bring out smiles this Halloween!
PrintHalloween Coffin Sandwiches

Halloween Coffin Sandwiches offer a fun, spooky twist to the classic sandwich, perfect for parties or creative lunches.
- Prep Time: 15 minutes
- Cook Time: 0 minutes
- Total Time: 15 minutes
- Yield: 6 servings
- Category: Snack
- Method: No-Cook
- Cuisine: American
- Diet: Non-Vegetarian
Ingredients
- ⅓ cup mayonnaise
- 1 tablespoon Dijon mustard
- 12 thin slices sandwich bread
- 12 slices ham
- 7 slices cheese
Instructions
- Mix the Spread: In a small bowl, combine the mayonnaise and Dijon mustard. Stir until thoroughly mixed.
- Prepare the Bread: Spread a thin layer of the mayo-mustard mixture over each slice of bread.
- Assemble the Sandwiches: Top 6 of the bread slices with a layer of ham and a layer of cheese. Cover each with one of the remaining slices.
- Trim the Crusts: Using a sharp knife, carefully trim off the crusts from each sandwich.
- Cut into Coffins: Cut each sandwich in half to form rectangles and trim the corners.
- Add Details: Cut thin strips from the last slice of cheese and arrange on top of each sandwich.
- Chill: Cover the sandwiches with plastic wrap and refrigerate until ready to serve.
Notes
Use fresh bread for better texture, and consider using sharp knives for cleaner cuts.