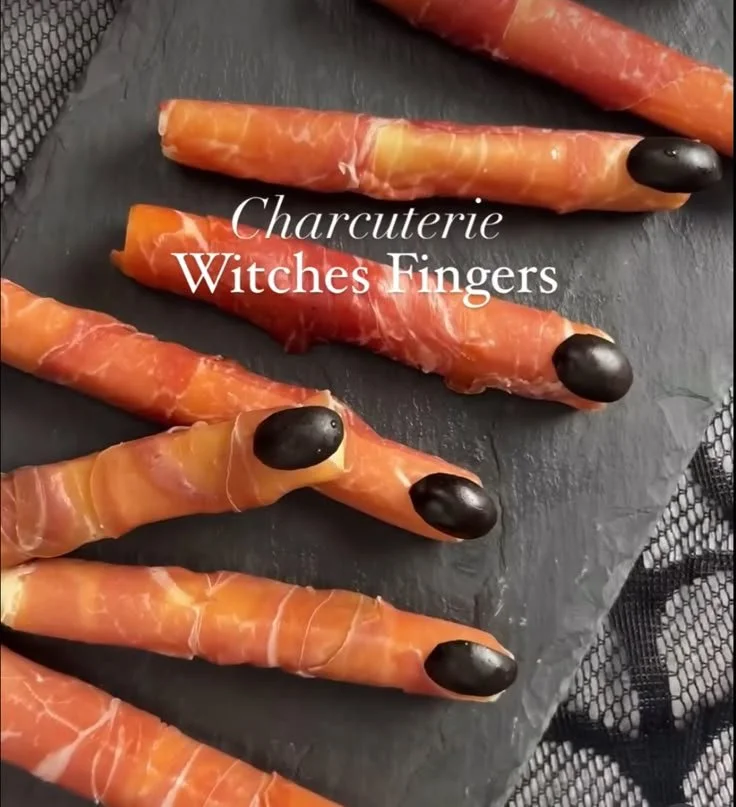
Charcuterie Witches Fingers are a fun and spooky addition to any Halloween gathering or themed party. These delicious, finger-shaped appetizers not only pack a flavorful punch but also serve as an eye-catching conversation starter. Perfect for both kids and adults, this recipe will make your celebration memorable and festive.
Why You’ll Love Charcuterie Witches Fingers
- Spooky Presentation: Each witch’s finger resembles a creepy, green finger with a realistic almond "nail," making them a hit at any Halloween event.
- Versatile Ingredients: You can customize the filling with your favorite cheeses and meats, allowing you to cater to different tastes.
- Easy to Assemble: With just a few simple steps, even beginner cooks can whip these up quickly, making them a fantastic last-minute option.
- Perfect for Sharing: Designed for parties, these finger foods encourage guests to mingle while snacking, making your gathering more interactive.
- Kid-Friendly Fun: Children enjoy the playful nature of these treats, making them an exciting addition to your Halloween festivities.
Recipe Overview
- Prep Time: 15 minutes
- Cook Time: 20 minutes
- Total Time: 35 minutes
- Servings: 24 fingers
- Difficulty Level: Easy
Ingredients You’ll Need for Charcuterie Witches Fingers
-
For the fingers:
- 1 sheet ready-made puff pastry
- (Thaw in the refrigerator for a few hours or at room temperature for 30 minutes)
- 8 oz cream cheese, softened
- (Choose herbed cream cheese for extra flavor)
- 4 oz deli meats (prosciutto, salami, or turkey)
- (Feel free to mix different meats for variety)
- 1 sheet ready-made puff pastry
-
For embellishing:
- 24 whole almonds
- (Select unseasoned almonds for a natural look)
- Green food coloring (optional)
- (Use it to tint the cream cheese to your preference)
- 24 whole almonds

How to Make Charcuterie Witches Fingers
-
Preheat the Oven: Set your oven to 375°F (190°C) to ensure it’s hot and ready.
-
Roll Out the Pastry: On a lightly floured surface, unfold the puff pastry and roll it out gently to smoothen creases. Cut the pastry into 1-inch wide strips, each about 5 inches long.
-
Prepare the Filling: In a bowl, mix the softened cream cheese and meats until well combined. If using green food coloring, add a few drops to achieve the desired green hue.
-
Assemble the Fingers: Take a strip of puff pastry and place a tablespoon of the cream cheese mixture at one end. Fold the pastry over the filling, sealing it tightly to avoid leaks. Shape it to look like a finger by pinching one end to form a tip.
-
Add the "Nail": Place an almond at the tip of each finger to resemble a nail. Use your fingers to gently press it in, ensuring it stays put during baking.
-
Bake: Arrange the assembled witch fingers on a baking sheet lined with parchment paper. Bake for 20 minutes or until golden brown and puffed.
-
Cool and Serve: Once baked, let them cool slightly before serving. They can be enjoyed warm or at room temperature.
Tips for Success
- Don’t Overfill: Ensure you don’t overstuff the pastry to prevent it from bursting during baking.
- Seal Well: Make sure the seams where you fold the pastry are tightly sealed to avoid leaks.
- Use Parchment Paper: This helps in easy cleaning and prevents sticking.
- Watch the Baking Time: Each oven is different; keep an eye on the witch fingers to ensure they don’t burn.
- Customize the Fillings: Feel free to experiment with different cheeses or add herbs to the cream cheese for an extra flavor boost.
Easy Variations
- Cheese Swap: Use goat cheese or cheddar instead of cream cheese for different flavors and textures.
- Herb-Infused: Add fresh herbs like chives or dill to the cream cheese for a more savory punch.
- Vegetarian Option: Replace deli meats with roasted vegetables or marinated olives.
- Dairy-Free Version: Use a plant-based cream cheese to accommodate dietary preferences.
- Spicy Kick: Mix in a dash of hot sauce or red pepper flakes to the filling for some heat.
What to Serve with Charcuterie Witches Fingers
- Spooky Dips: Pair with a black bean dip or guacamole for a fun twist.
- Pumpkin Soup: A warm, creamy pumpkin soup complements the flavors perfectly.
- Cheese Platter: Add a selection of cheeses to balance the savory flavors of the fingers.
- Veggie Platter: A colorful array of fresh veggies provides a refreshing crunch alongside the witches fingers.
Storage and Reheating
- Refrigerator Storage: Store any leftovers in an airtight container in the fridge for up to 3 days.
- Freezer Storage: You can freeze uncooked assembled witch fingers. Place them in a single layer on a baking sheet until firm, then transfer to a freezer-safe container. They can be baked directly from frozen, adding a few extra minutes to the baking time.
- Reheating: To reheat, place the fingers back in a preheated oven at 350°F (175°C) for about 10 minutes until warmed through. This method helps retain the crispy texture.
Common Mistakes to Avoid
- Skipping Thawing: Make sure the puff pastry is fully thawed; using it while still frozen can lead to uneven baking.
- Inadequate Sealing: Not sealing the edges tightly can cause the filling to ooze out during baking.
- Baking at the Wrong Temperature: Ensure your oven is correctly preheated to avoid undercooked or burnt fingers.
- Overcrowding the Baking Sheet: Give each finger enough space on the baking sheet to puff up properly.
Charcuterie Witches Fingers: Background & Cultural Inspiration
Charcuterie boards have become increasingly popular as a way to showcase an array of meats, cheeses, and accompaniments. The concept of using such boards as a festive centerpiece adds a culinary aspect to social gatherings. Witches Fingers particularly encapsulate the essence of Halloween, where playful spookiness becomes a canvas for creativity in food presentation. By incorporating traditional flavors into a whimsical form, this recipe invites guests to enjoy both the dinner and the decor.
Frequently Asked Questions
Can I make Charcuterie Witches Fingers ahead of time?
Yes, you can prepare these ahead of time. Assemble them and store them in the fridge where they keep well for 24 hours before baking.
What can I substitute for the almond “nail”?
If you don’t have almonds, try using cashews, sunflower seeds, or even a slice of a green pepper for a different look.
How spicy can I make the filling?
The spice level can be adjusted based on your preferences; start with a little hot sauce and taste test before adding more.
Can I use homemade pastry instead of store-bought?
Yes, homemade pastry works well too; just ensure it has a similar flaky texture.
Are there any gluten-free options available?
You can use gluten-free puff pastry options available in stores to cater to gluten sensitivities.
Final Thoughts
Making Charcuterie Witches Fingers is a fantastic way to add some playful fun to your holiday festivities. They’re easy to prepare, customizable to suit various tastes, and sure to be a conversation starter at any gathering. With their spooky appearance and delightful flavors, these tasty treats are worth trying for your next event. Enjoy the process of making them and delight in the smiles they bring!