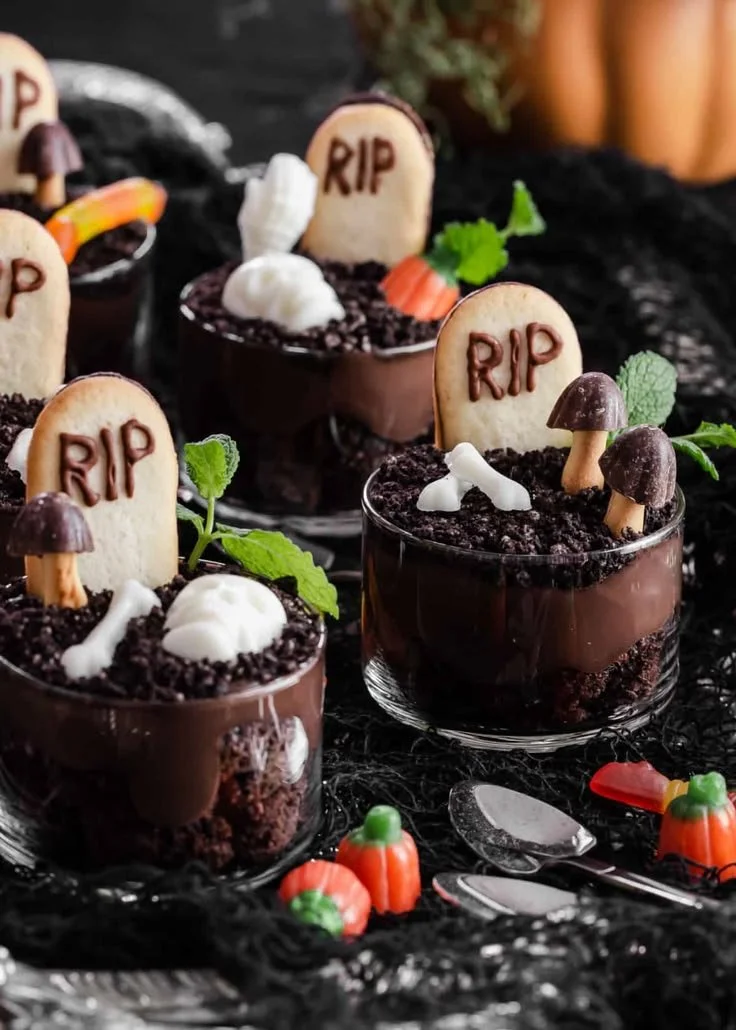
Halloween Dirt Pudding Cups are a fun and delightful treat that will enchant both kids and adults alike. This easy-to-make dessert captures the spirit of Halloween, putting a playful spin on classic flavors. With layers of creamy chocolate pudding, crushed Oreo cookies, and colorful gummy worms, this recipe is sure to become a Halloween favorite.
Why You’ll Love Halloween Dirt Pudding Cups
- Simple to Prepare: This recipe requires no baking and can be made in just a few minutes, making it perfect for busy families.
- Fun Presentation: The layered look of these dessert cups is visually appealing, especially with the added gummy worms, which bring an exciting element to the table.
- Customizable: You can easily adjust the ingredients to suit your preferences, ensuring a delightful experience for everyone.
- Great for Occasions: Whether it’s a Halloween party, a school event, or a family gathering, these pudding cups make a festive and fun treat.
- Kid-Friendly: This dessert involves minimal kitchen skills and is a great way for kids to join in on the fun, from crushing the Oreos to layering the cups.
Recipe Overview
- Prep Time: 10 minutes
- Cook Time: 0 minutes (just chilling time if taken)
- Total Time: 10 minutes plus chilling (optional)
- Servings: 4-6 cups
- Difficulty Level: Easy
Ingredients You’ll Need for Halloween Dirt Pudding Cups
-
For the Pudding Layer:
- 1 package chocolate instant pudding mix
- 2 cups milk
-
For the Dirt Layer:
- 1 package Oreo cookies, crushed
-
For Decoration:
- Gummy worms
- Whipped cream (optional)
-
For Serving:
- Cups for serving
Notes:
- Milk: Whole or 2% milk works best for a creamy texture.
- Oreo Cookies: Any chocolate sandwich cookies will suffice if you want to substitute.
- Whipped Cream: Adds a nice touch if you want a fluffier finish above the layers.

How to Make Halloween Dirt Pudding Cups
-
Prepare the Pudding: In a mixing bowl, combine the chocolate pudding mix and milk. Whisk together until smooth, following package instructions. This usually takes about 2 minutes.
-
Let it Thicken: Allow the pudding mixture to sit for about 5 minutes until it thickens to the right consistency.
-
Layer the Cups: In your serving cups, start with a layer of the chocolate pudding, followed by a layer of the crushed Oreo cookies to resemble dirt.
-
Add the Worms: Top the dessert with gummy worms, placing them on the Oreo layer to make it look like they’re crawling out of the “dirt.”
-
Finishing Touch: If desired, add a dollop of whipped cream on top of the gummy worms for decoration.
-
Serve or Chill: These cups can be served immediately or chilled in the refrigerator until you’re ready to enjoy them.
Tips for Success
- Pudding Consistency: Ensure that the pudding is whisked thoroughly to avoid lumps.
- Crushing Oreos: Use a food processor for a finer texture, or seal the cookies in a plastic bag and crush them with a rolling pin for a coarser texture.
- Layering: Build the layers right before serving for the best texture; the cookies can become soggy if left too long.
- Gummy Worms: Place them in different positions for a playful look—some partially hidden and others hanging over the sides of the cup.
- Presentation: Use clear cups to showcase the layers effectively.
Easy Variations
- Dirt Cake: For a larger dessert, use a large trifle dish instead of individual cups.
- Nut Allergies: Substitute chocolate pudding with vanilla pudding and add cocoa powder for color.
- Fruit Addition: Mix in some chopped strawberries or bananas for a fruity twist.
- Seasonal Swaps: Use candy corn or seasonal gummy candies instead of worms for other holidays.
- Dairy-Free: Use almond or coconut milk and vegan pudding mix for a dairy-free option.
What to Serve with Halloween Dirt Pudding Cups
- Ghostly Cupcakes: Complement the cups with spooky-shaped cupcakes for a cohesive dessert table.
- Blood Orange Spritzers: Serve with a refreshing drink like blood orange seltzer for a festive touch.
- Cheese and Crackers: Offer some savory snacks to balance out the sweetness of the dessert.
- Halloween-Themed Fruit Platter: A platter of black grapes and orange slices adds a healthy option that fits the color theme.
- Licorice Strings: For a fun side, twisted licorice can mimic spider legs.
Storage and Reheating
- Refrigerator Storage: Keep the pudding cups in an airtight container in the fridge for up to 3 days.
- Freezer Storage: Freezing is not recommended as it alters the texture of the pudding once thawed.
- Preserving Texture: If preparing in advance, store the crushed Oreos separately and layer them right before serving to maintain crunchiness.
- Meal Prep Note: You can prepare the pudding and crush the Oreos ahead of time.
Common Mistakes to Avoid
- Overmixing: Whisking the pudding too much can incorporate too much air, leading to a fluffy texture rather than creamy.
- Soggy Cookies: Assemble the cups too early, and the Oreos can lose their crunch, thus compromising the overall texture.
- Skipping Chill Time: Allowing the pudding to sit for the full recommended time ensures the right thickness.
- Using Warm Milk: Make sure to use cold milk as warm milk can affect the pudding’s texture.
- Not Reading Instructions: Always follow the instructions on the pudding package for the best results.
Halloween Dirt Pudding Cups: Background & Cultural Inspiration
Halloween Dirt Pudding Cups draw inspiration from the classic concept of "dirt" desserts, often enjoyed during Halloween festivities. The combination of visually appealing layers and the playful presence of gummy worms symbolizes the holiday’s spooky spirit while remaining family-friendly. Originally popularized in the 1980s, these desserts evoke nostalgia and invite creativity, allowing cooks to innovate and personalize their presentations through various toppings and flavors. Halloween is a time for treats, both spooky and sweet, and this playful dessert fits perfectly into the celebration of harvest and whimsy.
Frequently Asked Questions
Can I make this dessert in advance?
Yes, you can prepare the pudding and crush the Oreos ahead of time. Assemble the cups right before serving to keep the cookies crisp.
What can I substitute for gummy worms?
You could use candy corn, chocolate spiders, or edible glitter for decoration, depending on your theme.
How long do these dessert cups last?
They will stay fresh in the refrigerator for up to 3 days, but it’s best to layer them right before serving for the best texture.
Is there a gluten-free option?
To make this dessert gluten-free, use gluten-free chocolate sandwich cookies instead of Oreos.
Can I use homemade pudding instead of instant?
Absolutely! Just make sure it’s fully cooled before layering, as homemade pudding has a different consistency compared to instant.
Final Thoughts
Halloween Dirt Pudding Cups are not only easy to prepare but also a delightful way to celebrate the spooky season. With just a few ingredients and minimal effort, you can create a striking dessert that everyone will love. Whether for a party or a cozy night in, these fun cups are a great choice that combines creativity with deliciousness. Don’t hesitate to whip these up and bring a smile to your family and friends this Halloween!